
Miss Szanto's DIY Electric drum Kit instructions
- isabel szanto
- Nov 28, 2019
- 6 min read
Updated: Nov 29, 2019
Step by Step instructions on 'how to build a studio electric drum kit' for the music classroom
Having successfully built two midi drum kits for my technology in music education negotiated project, I decided to compile a set of instructions for students and teachers who wish to replicate this in the music classroom. I would absolutely encourage anyone who's thinking about building this midi drum kit to go for it; it's an enjoyable process and very rewarding to hear a seemingly ordinary mouse pad come to life through the Arduino.
There is also an exciting opportunity with this project for cross-curricula, particularly with the STEM subjects.
Instructions adapted from:
RESOURCES
What you'll need (to make one drum kit):
- 4 mouse pads
- 1 Arduino Starter Kit
- 1 set of drum sticks
- 5 piezo elements
- 4 CDs
- Computer with a USB port (e.g. Mac or PC)
- 1 jar lid
- Elastic band
Other materials you'll need to put the drum together (these can be borrowed from other departments within a school):
- Soldering iron
- Solder wire
- Super glue
- Dupont connector kit (rainbow wire, female pin connectors, male pin connectors)
- Crimping tool
- Wire cutter
- Wire stripper
- Masking tape
- Scissors
- Lighter/matches
METHOD
Making the drum pads:
1) Trace two CDs onto each of the four mouse pads (one mouse pad can be used to cut out two CD shapes) and then cut out the 8 CD shapes in total.
2) Glue one side of mouse pad onto the CD (do this for each of the four CDs).
Making the Jumper Wire:
3) Measure and cut 1m of rainbow wire.
4) Separate the rainbow wire into pairs and then separate each end of the pairs of wire (pull wire about 4-5 cm apart on each end).
5) Cut 1cm off the plastic on each end of the rainbow wire using the wire stripper (4 ends in total per piece of rainbow wire).
6) Place the male pin connectors in the first slot of the crimping tool and place one of the four ends of the rainbow wire (which has had 1cm of plastic removed from the end) into the connector and squeeze the handles of the crimping tool together.
Tip: Ensure that the exposed wire has reached the other side of the crimping tool before pressing down on the handles (see picture below).

7) Place a female pin connector into the male pin connector and pull the male pin connector through until you hear a click.
8) Cut a small piece of black heat shrinkable tubing for the second wire of the pair and place on the end of the jumper wire. Repeat steps 6 and 7.
Once complete, use a match/lighter to heat the black tubing onto the jumper wire.
9) Repeat steps 6-8 for the four remaining rainbow wire pairs.
Soldering the piezo elements to the Jumper Wire:
10) Cut 1cm off the plastic ends of each of the piezo wires (5 piezo in total).
11) Place a piece of red heat shrinkable tubing on one end of the jumper wire and black heat shrinkable tubing on the other end of the jumper wire.
12) Solder the two ends of each piezo element onto the exposed wires of the jumper wire.
12) Use a match/lighter to melt the heat shrinkable tubing onto the soldered wires.
13) Place the piezo elements in the centre of the CDs prepared earlier and use masking tape to secure them in place.
14) Glue the remaining mouse pads onto the CD using superglue, ensuring that the superglue doesn't come into contact with the piezo element.
15) Cut out two small circles for the bass drum using the excess mouse pad material (small enough to fit inside the jar lid) and use masking tape to secure the piezo element inside the mouse pad 'sandwich.'
Measure and cut two 40cm pieces of elastic band and glue this across the bottom of the jar lid.
Glue the mouse pad to the inside of the jar lid (see pictures below).


Setting up the Arduino:
16) Download the Arduino IDE available here - https://www.arduino.cc/en/Main/Software
17) Set up the whiteboard of the Arduino as shown below:
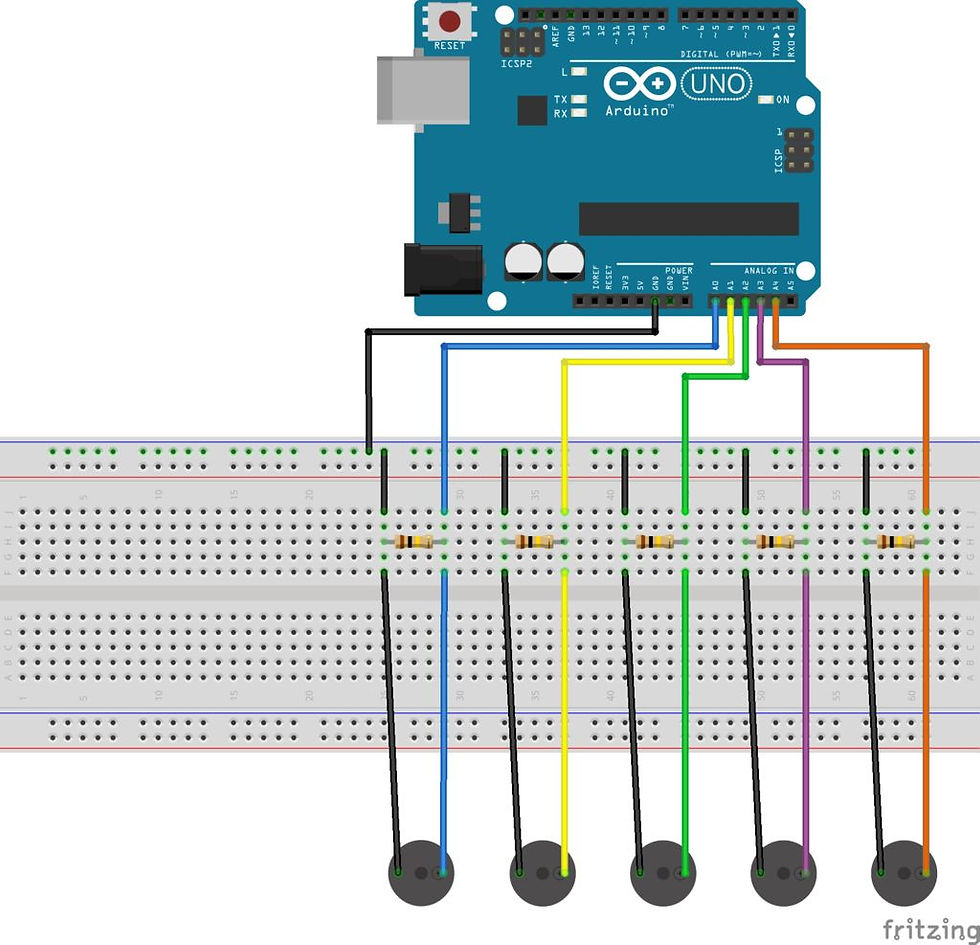
18) Copy and paste the code below and enter it in the sketch of the Arduino program:
//PIEZOS ARE CONNECTED TO ANALOG PINS
const int caixa = A0;
const int charles = A1;
const int tomtom = A2;
const int crash = A3;
const int bombo = A4;
const int threshold = 100; // threshold value to decide when the detected sound is a knock or not
// READ AND STORE THE VALUE READ FROM SENSOR PINS
int caixaReading = 0;
int charlesReading = 0;
int tomtomReading = 0;
int crashReading = 0;
int bomboReading = 0;
void setup() {
Serial.begin(9600); // use the serial port
}
void loop() {
caixaReading = analogRead(caixa); // read the sensor and store it in the variable sensorReading:
if (caixaReading >= threshold) { // if the sensor reading is greater than the threshold:
Serial.print("0,"); // IF YOU HIT THE CAIXA, SEND 0 TO PROCESSING
Serial.println(caixaReading);
}
charlesReading = analogRead(charles);
if (charlesReading >= threshold) {
Serial.print("1,"); Serial.println(caixaReading); // IF YOU HIT THE CHARLES, SEND 1 TO PROCESSING
}
tomtomReading = analogRead(tomtom);
if (tomtomReading >= threshold) {
Serial.print("2,"); // IF YOU HIT THE CAIXA, SEND 2 TO PROCESSING
Serial.println(tomtomReading);
}
crashReading = analogRead(crash);
if (crashReading >= threshold) { // IF YOU HIT THE CAIXA, SEND 3 TO PROCESSING
Serial.print("3,");
Serial.println(crashReading);
}
bomboReading = analogRead(bombo);
if (bomboReading >= 15) {
Serial.print("4,"); // IF YOU HIT THE CAIXA, SEND 4 TO PROCESSING
Serial.println(bomboReading);
}
delay(10); // delay to avoid overloading the serial port buffer
}
19) Load the code onto the Arduino using this resource for guidance - https://www.youtube.com/watch?v=ELUF8m24sZo&t=183s
Setting up Processing:
20) Download the Processing program available here - https://processing.org/download/
21) Copy and paste the code below into Processing:
//IMPORT SOUND AND SERIAL LIBRARIES
import processing.sound.*;
import processing.serial.*;
Serial myPort; // Create object from Serial class
String val; // Data received from the serial port
//DRUM SOUNDS
SoundFile caixa;
SoundFile charles;
SoundFile tomtom;
SoundFile crash;
SoundFile bombo;
//DRUMS STUDIO WAVES VARIABLES
float n = 0;
float n2 = 1;
float n3 = 2;
float n4 = 3;
float n5 = 4;
float y = 0;
float y2 = 1;
float y3 = 2;
float y4 = 3;
float y5 = 4;
void setup()
{
// OPEN WHATEVER PORT IS THE ONE YOU'RE USING
String portName = Serial.list()[4]; //change the 0 to a 1 or 2 etc. to match your port
myPort = new Serial(this, portName, 9600);
//DRUMS STUDIO CONSOLA
size(720, 680);
background(15, 15, 15);
strokeWeight(2);
//LOAD SOUNDS
caixa = new SoundFile(this, "caixa.aiff");
charles = new SoundFile(this, "charles.aiff");
tomtom = new SoundFile(this, "tomtom.aiff");
crash = new SoundFile(this, "crash.aiff");
bombo = new SoundFile(this, "bombo.aiff");
}
void draw()
{
//TITULO DRUMS STUDIO
/*
image(img0, 125, 0);
//WAVES DRAWING
if (y>720) //Start the waves again
{
y = 0;
y2 = 1;
y3 = 2;
y4 = 3;
y5 = 4;
}
fill(0, 10);
rect(0, 0, width, height);
// Dejamos fill a blanco para
// dibujar la bola
fill(255);
stroke(250, 255, 3);
point(y, (height-40) + sin(n) * 30);
n = n + 0.05;
y = y + 1;
stroke(250, 255, 3);
point(y2, (height-40) + cos(n2) * 30);
n2 = n2 + 0.05;
y2 = y2 + 1;
stroke(250, 255, 3);
point(y3, (height-40) + sin(n3) * 30);
n3 = n3 + 0.05;
y3= y3 + 1;
stroke(250, 255, 3);
point(y4, (height-40) + cos(n4) * 30);
n4 = n4 + 0.05;
y4 = y4 + 1;
stroke(250, 255, 3);
point(y5, (height-40) + sin(n5) * 30);
n5 = n5 + 0.05;
y5 = y5 + 1;
*/
//DIBUJO BATERIA SIN NINGUNA PARTE ILUMINADA
//MAKE OUTPUTS FOR EVERY INPUT
if ( myPort.available() > 0)
{ // If data is available,
//println("test3");
val = myPort.readStringUntil('\n');// read it and store it in val
println (val);
String[] list = split(val, ','); //Open a list for taking every input value
if (list!=null )
{
if (list[0].equals("0")) { //if you hit the caixa
caixa.play(); //Play caixa sound
//The caixa is iluminated in the screen
println("caixa"); //print it out in the console
}
else if (list[0].equals("1")) { //if you hit the charles
charles.play(); //Play charles sound
//The charles is iluminated in the screen
println("charles"); //print it out in the console
}
else if (list[0].equals("2")) { //If you hit the tomtom
tomtom.play(); //Play tomtom sound
//Tomtom is iluminated in the screen
println("tomtom"); //print it out in the console
}
else if (list[0].equals("3")) { //If you hit the crash
crash.play(); //Play crash sound
//Crash is iluminated in the screen
println("crash"); //print it out in the console
}
else if (list[0].equals("4")) { //if you hit the bombo
bombo.play(); //Play bombo sound
//Bombo is iluminated in the screen
println("bombo"); //print it out in the console
}
}
}
}
22) Download the following files for the drum kit available here - https://www.dropbox.com/sh/m8bdfsu2cy7y2ve/AADI8UZ2xjkyN2e6ZNZT5lnqa?dl=0
N.B.
File labelled caixa is a hi-hat
File labelled charles is a snare
File labelled tomtom is tom 1
File labelled crash is tom 2
File labelled bombo is bass
23) Download these files in a folder labelled 'libraries' and run the code from the Processing program.
For questions and queries, please send me a message through twitter, email or through this website :)
Enjoy your new midi drum kit!!
Suggested products:
- Mouse Pad: https://www.target.com.au/p/target-mouse-pad/60196187 ($3)
- Arduino Starter kit: https://www.jaycar.com.au/duinotech-arduino-starter-kit/p/XC3902 ($40 )
- Soldering Iron: https://www.jaycar.com.au/25-watt-240v-soldering-iron/p/TS1465 ($14)
- Piezo elements: https://core-electronics.com.au/piezo-element.html ($2.40 each)
For a more detailed look at each step, with tips and suggestions check out my 'tech project updates' blog.


Comments